The Leads feature in Track-New Software is designed to help you efficiently manage and track potential clients or business opportunities.
Leads Features Works in Track-New Service CRM
Here’s a step-by-step guide on how to make the most of this feature:
1. Creating a Lead
To begin utilizing the Leads feature, the first step is to create a new lead:
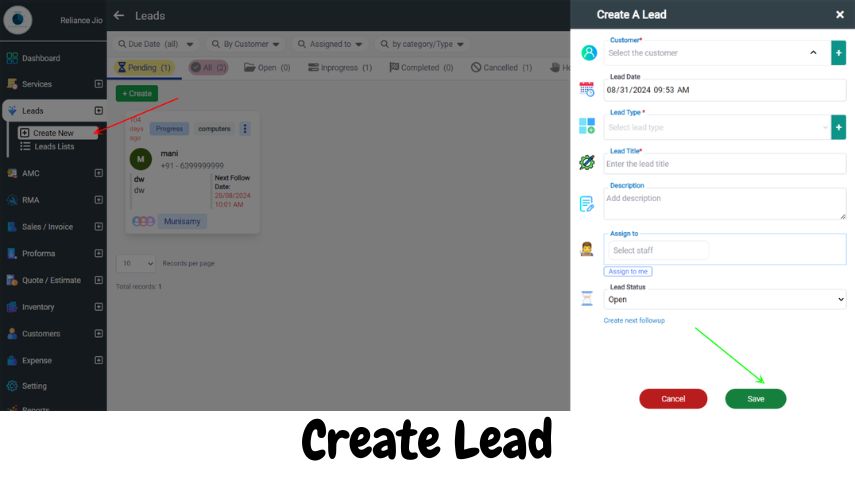
- Step 1: Click on the “Create A Lead” button in the Leads section of the software.
- Step 2: Fill in the required information in the lead creation form:
- Customer: Select an existing customer from the dropdown or add a new one by clicking the “+” button.
- Lead Date: Specify the date and time when the lead was created.
- Lead Type: Choose the type of lead from the dropdown menu. If needed, add a new lead type by clicking the “+” button.
- Lead Title: Enter a descriptive title for the lead to identify it easily.
- Description: Provide any additional details about the lead that may be relevant for follow-ups or future reference.
- Assign to: Select the staff member responsible for handling the lead from the dropdown or assign it directly to yourself by clicking “Assign to me.”
- Lead Status: Set the current status of the lead (e.g., Open, Contacted, Qualified).
- Step 3: Click “Save” to add the lead to your database.

2. Scheduling Next Follow-ups
Once a lead is created, it’s essential to schedule follow-ups to maintain engagement and progress the lead through your sales funnel:
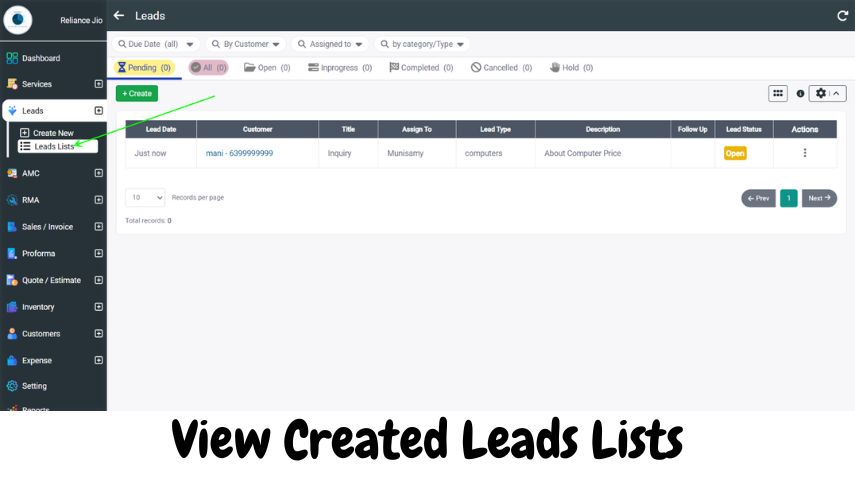
- Step 1: Navigate to the lead’s detail page by clicking on it from the Leads list.
- Step 2: Click on the “Create next followup” link to open the follow-up scheduling interface.
- Step 3: Enter the details for the follow-up, such as the date, time, and any notes regarding the interaction.
- Step 4: Click “Save” to schedule the follow-up. This helps ensure timely communication with potential clients.

3. Viewing and Managing Leads
Track-New Software provides a comprehensive view of all your leads, allowing you to manage and monitor them effectively:
- Leads Dashboard: The dashboard offers an overview of all leads, including their status, assigned staff, and next follow-up dates. You can filter leads based on various criteria such as lead type, status, or assigned staff to focus on specific groups.
- Lead Details: Click on any lead to view detailed information, including all past interactions, attached documents, and notes. This view allows you to edit lead details, change statuses, add notes, and upload documents, providing a centralized location for all lead-related information.

4. Updating Lead Status
Keeping the status of each lead up-to-date is crucial for effective lead management:
- Step 1: Open the lead’s detail page.
- Step 2: In the “Lead Status” dropdown, select the new status that reflects the current stage of the lead (e.g., Contacted, Negotiating, Won, Lost).
- Step 3: Click “Update” to save the changes. This helps keep your sales team informed and aligned on the current status of all leads.
By following these steps, you can effectively use the Leads feature in Track-New Service CRM Software to manage potential customers, streamline follow-ups, and optimize your sales process.
