The Return Merchandise Authorization (RMA) feature in Track-New Software is designed to streamline the repair and return process, making it easier for businesses to manage product repairs, track their statuses, and communicate with customers and suppliers. This guide will help you understand how to effectively use the RMA feature in Track-New Software.
Step up Step Process for RMA Feature
1. Creating a New RMA
To create a new Returm Merchandise Authorization, follow these steps:
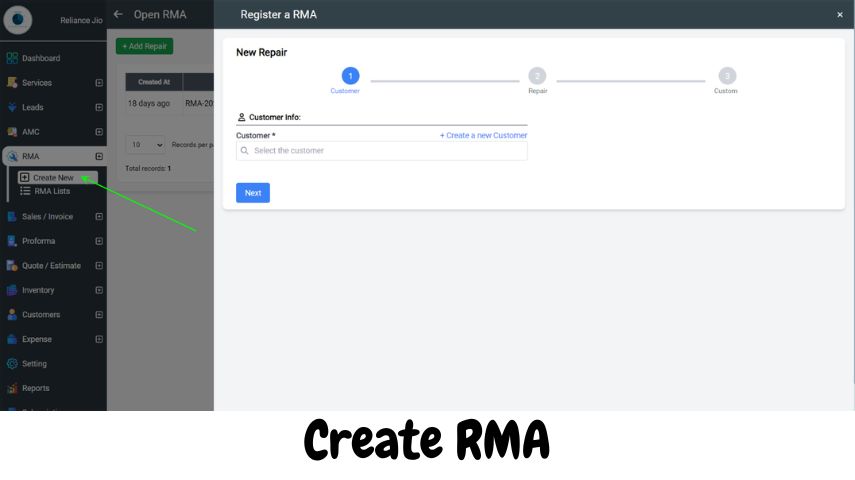
- Step 1: Navigate to the “RMA” section in the Track-New Software dashboard.
- Step 2: Click on the “Create RMA” button to open the RMA creation form.
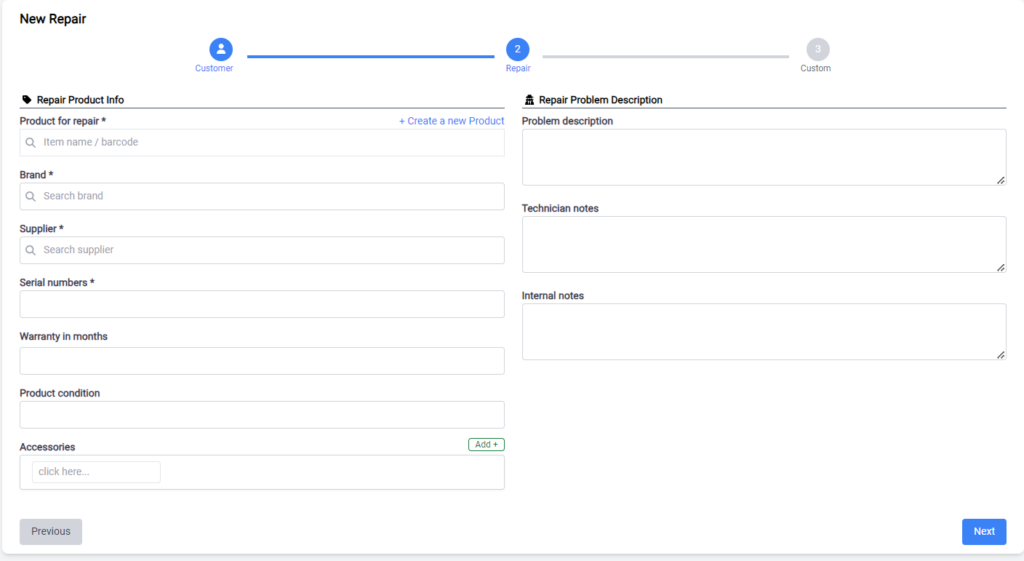
- Step 3: Fill in the necessary details in the form:
- Product for Repair: Enter the product name, item code, or barcode. If the product is not listed, you can create a new entry by clicking on “+ Create a new Product.”
- Brand: Select the brand of the product from the dropdown list.
- Supplier: Choose the supplier associated with the product.
- Serial Numbers: Enter the serial number(s) of the product.
- Warranty in Months: Indicate the warranty period if applicable.
- Product Condition: Provide details on the condition of the product when it was received.
- Accessories: List any accessories included with the product.
- Step 4: Add a detailed Problem Description explaining the issue with the product.
- Step 5: Fill in Technician Notes with any specific instructions or observations.
- Step 6: Include Internal Notes for any additional details that might be useful for your team.
- Step 7: Click “Next” to save the information and move forward with the RMA process.


2. Updating RMA Status
After creating an RMA, you can update its status as it progresses through various stages. Here are the status options available in Track-New Software:
- Awaiting Customer Confirmation: The RMA is waiting for the customer’s confirmation to proceed with the repair or replacement.
- Awaiting Parts: The required parts for the repair have been ordered and are pending arrival.
- Awaiting Repair: The product is queued and ready to be assigned to a technician for repair.
- Awaiting Supplier: The RMA is awaiting parts or information from the supplier.
- Awaiting to be Sent to Supplier: The product needs to be shipped to the supplier for repair or replacement.
- Credit: The customer has been credited, possibly due to a replacement or a refund.
- Ready to Deliver: The repair is complete, and the product is ready to be returned to the customer.
- Repair Completed: The repair process has been successfully completed.
- Repair in Process: The product is currently being repaired by a technician.
- Repaired/Replacement from Supplier: The product has been repaired or replaced by the supplier and is ready for further actions.
- Sent to Customer: The repaired or replaced product has been dispatched to the customer.
- Sent to Supplier: The product has been sent to the supplier for repair or replacement.
- Waiting New Battery: The repair is on hold, pending the arrival of a new battery.
- Delivered: The repaired product has been successfully delivered to the customer.

3. Managing and Tracking RMAs
Track-New Software provides several tools to help you manage and track RMAs:
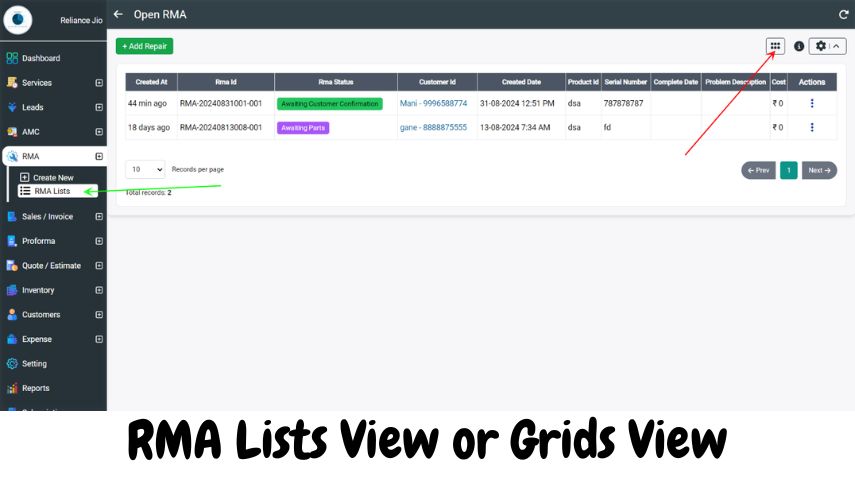
- RMA Dashboard: View all active RMAs and their current statuses in the RMA dashboard. This dashboard gives you a clear overview of all ongoing repairs and their stages.
- Filtering and Sorting: Use filters to sort RMAs based on their statuses, such as “Awaiting Parts” or “Repair in Process,” allowing you to prioritize actions and manage workflows effectively.
- Notifications and Alerts: Set up notifications to receive alerts when there is a status update or when an RMA requires immediate attention, ensuring that all RMAs are handled promptly.
- Customer Communication: Keep customers informed by sending automated updates as their RMA progresses through different stages. This improves transparency and enhances customer satisfaction.
4. Completing and Closing RMAs
Once a repair is completed and the product is delivered back to the customer, you can close the RMA:
- Step 1: Open the completed RMA from the RMA dashboard.
- Step 2: Verify that all details are correct and that the product has been delivered successfully.
- Step 3: Change the RMA status to “Delivered” and click “Save” to close the RMA.
- Step 4: Archive closed RMAs for future reference, maintaining a complete record of all repairs and customer interactions.
By following these steps, you can effectively use the RMA feature in Track-New Software to manage repairs, track product statuses, and maintain strong customer relationships.
